Those of you who have read this blog for a while (or even just skimmed it and noticed the pictures) know that I have never claimed to be a photo blogger. I don't imagine I will ever post recipes in photo by photo detail, with ingredients neatly displayed on my counter and dozens of images of each step along the way. I don't even really enjoy reading posts like that, so it's doubtful that I'd ever adopt that style. I'm more of a "give me the money shot and get to the recipe already" kind of person.
That said, I got thinking about my humble blog as the new year began. I don't think I want to be a mega-blogger, with deadlines and sponsors and thousands of readers. Not right now. I like being a small time blogger in a big pool of talent. It affords me the time to be inspired and learn from that inspiration. So it is with photography. I looked up the manual for my little Nikon 8mp camera the other day and discovered that I can do things with it. Like use a setting called "macro" to take better close up shots. And play with light levels so that not everything I take a picture of in natural light looks like it's glowing.
There is a lot to read, and I have much practice before I can claim that I'm doing well, but I played a bit today and I think I got an image or two hat I can say are better than they would have been before I was inspired to learn more.
And on the plus side, having cookies to photograph means that we have cookies to eat. These were inspired by Chef Michael Smith's chocolate chip cookies.
Marbled Cocoa Chip Cookies
1/2 cup butter, softened
1/3 cup dark brown sugar
1/3 cup white sugar
1 tablespoon corn syrup
1 egg
2 teaspoons pure vanilla extract
1/4 teaspoon salt
1 1/2 cups all purpose flour
1 teaspoon baking powder
1/4 cup cocoa
1 cup chocolate chips
Instructions
Preheat oven to 375°F (190°C).
In a large bowl (or stand mixer) cream the butter and sugars together until smooth. Add the corn syrup, egg, vanilla and salt and beat until totally blended. Scrape down the bowl, sprinkle over the baking powder and add the flour, mixing just until combined (yeah, I don't follow standard cookie protocol). Stir in the cocoa and chocolate chips until just marbled. Streaks of cocoa should still be visible (it may be best to do this by hand, as I overmixed it a bit in my stand mixer).
Working with a teaspoon, scoop up some dough and roll it between your hands and flatten it lightly on a greased or or lined cookie tray. Leave space for the cookies room to expand.
Bake for 12 minutes (15 if you like them crisper), and let cool on a wire rack.
I got 2 dozen from this.
"The journey of a thousand miles begins with a single step." Welcome to my first steps. And some of my second, third and fourth steps. This blog started out as a place for all of me to explore, but over time my inner foodie has claimed it for herself. She's since been given a home at http://myediblejourney.wordpress.com. Slowly my inner everything else will reclaim this blog. "The point of the journey is not to arrive." ~Rush
Showing posts with label cookies. Show all posts
Monday, January 16, 2012
Friday, September 2, 2011
Party time
It's Labour Day weekend. Typically fun, but usually a bit low key around here. For most of my life I've either worked at (in my teen years) or gone to the local community carnival. Before kids we kind of stopped going, but now that the Littles are older it's fun to take them. Plus there's a parade and fireworks to look forward to.
I've been wanting to entertain on our new patio for a bit now, and since my first opportunity got rained out (in spectacular fashion - what a storm!), I decided to invite 4 couples around for a taco party. I smoked a large pork "butt" last month, and then shredded it up and froze it. I'll take it out (today, must remember) and fry it in batches to crisp the shreds up a bit. Then I'll pile the meat into the crock pot and serve it all with flour and corn tortillas, my lacto-fermented salsa, some guacamole that a friend is bringing, cheese, sour cream and pickled jalapenos. We'll probably have a bonfire and s'mores afterwards. Though I doubt I'll make the marshmallows myself. Then again, you never know.
The other day I made two chocolate cakes. Oh, did I mention that somehow my baby girl is turning 4 this weekend too? I don't know who told her she could get so big, but she has. So we're having a party for her on Sunday. At her request there will be pizza, chocolate cake (possible filled with Nutella) and... sushi. Yep, my soon to be 4 year old who has never had sushi or seen us eat it (we don't) wants to try it at her birthday party. Going with recommendations from my sister, a friend and a random stranger, I contacted a local restaurant about making a platter of miniature sushi and they are more than happy to accommodate my request. We will have 16 small bites and 16 regular sized pieces, with an assortment of fruit, veggie and cooked fish fillings. This should be interesting. Must remember the camera.
Then there's church snack. Without thinking, I volunteered to make snack for this Sunday when the call went out last week. Okay, no problem. Chocolate chip cookies are easy. But boring. So of course I had to play. The resulting Butterscotch Coffee Drops are on my Church Snacks Blog.
On Monday the inlaws have agreed to either make dinner, or take us all out. LOL
I've been wanting to entertain on our new patio for a bit now, and since my first opportunity got rained out (in spectacular fashion - what a storm!), I decided to invite 4 couples around for a taco party. I smoked a large pork "butt" last month, and then shredded it up and froze it. I'll take it out (today, must remember) and fry it in batches to crisp the shreds up a bit. Then I'll pile the meat into the crock pot and serve it all with flour and corn tortillas, my lacto-fermented salsa, some guacamole that a friend is bringing, cheese, sour cream and pickled jalapenos. We'll probably have a bonfire and s'mores afterwards. Though I doubt I'll make the marshmallows myself. Then again, you never know.
The other day I made two chocolate cakes. Oh, did I mention that somehow my baby girl is turning 4 this weekend too? I don't know who told her she could get so big, but she has. So we're having a party for her on Sunday. At her request there will be pizza, chocolate cake (possible filled with Nutella) and... sushi. Yep, my soon to be 4 year old who has never had sushi or seen us eat it (we don't) wants to try it at her birthday party. Going with recommendations from my sister, a friend and a random stranger, I contacted a local restaurant about making a platter of miniature sushi and they are more than happy to accommodate my request. We will have 16 small bites and 16 regular sized pieces, with an assortment of fruit, veggie and cooked fish fillings. This should be interesting. Must remember the camera.
Then there's church snack. Without thinking, I volunteered to make snack for this Sunday when the call went out last week. Okay, no problem. Chocolate chip cookies are easy. But boring. So of course I had to play. The resulting Butterscotch Coffee Drops are on my Church Snacks Blog.
On Monday the inlaws have agreed to either make dinner, or take us all out. LOL
Labels:
birthday,
butterscotch,
cake,
carnitas,
carnival,
coffee,
cookies,
party,
smoked pork,
sushi,
taco
Thursday, June 10, 2010
Mocha-scotch Truffle Cookies
Alright, I know I said I don't photo-blog (and you can tell by the quality of any pics I do post that I'm telling the truth). But I just couldn't post a recipe for these gems without a pic.
Friends of ours are having a baby soon (really soon) and some of us are coming together to provide freezer meals for them. And really, what's a freezer full of meals without a dessert option now and then? So I decided to make some cookies.
I took inspiration from another recipe which called for significantly less coffee. It also had nuts. Instead I increased the coffee granules in the recipe and used butterscotch chips. The result is a chewy, crispy cookie with a deep mocha flavour and a hit of unexpected butterscotch-y goodness. Yum!
Mocha-scotch Truffle Cookies
12 oz chocolate chips (not milk chocolate) - you could use a good dark chocolate
2 Tbsp butter
2 Tbsp instant coffee granules
3/4 C all purpose flour
1 tsp baking powder
1/2 tsp salt
3 eggs
1 C white sugar
1/4 C dark brown sugar
2 tsp vanilla extract
1 C butterscotch chips
Preheat oven to 325F and line a couple of baking sheets with parchment paper.
Using a double boiler (or not), melt together the chocolate, butter and coffee granules. Set aside to cool.
In a small bowl, whisk together the flour, baking powder and salt. Set aside.
Beat the eggs (I used my stand mixer, but an electric hand mixer would work) and slowly add the sugars. Beat for a few minutes until light coloured. Add the cooled chocolate mixture and beat until smooth. Scrape down the bowl and add the vanilla.
On low speed (or by hand) add in the flour mixture and butterscotch chips until just combined.
Drop by tablespoonfuls onto prepared sheets (the batter is thick and sticky), about 2 inches apart. Bake one sheet at a time for 15-18 minutes, until the cookies are set at the edges and still slightly squidgy in the centre (they will take on a crackled appearance).
Cool on a wire rack (slide the parchment onto it to make it easier), and enjoy.
Tuesday, March 23, 2010
What's really going on?
"There isn't a lot going on right now." How often do we say or think that? I haven't blogged in a bit because it feels like there's nothing going on. In reality, a lot has been going on. Some of it is more personal or family centred than I share in my blog. Some of it is just boring. And some of it has left me a little dazed and disillusioned.
For example, an online community of foodies that I nurtured for nearly a decade fell apart last week. We were a tiny group. Maybe a dozen on a really good day. But we had shared a lot. We were friends. Or so I thought. Turns out I was convenient, not cared about. I could set up and manage the actual community site, so I was needed. But eventually they all found social networking and showed their true colours. I'd been used.
Please don't think that this is a "poor me" type entry. It's not. I was just stunned by the emotional reaction I had to losing an online community. To losing people who, for the most part, I'd never met "in real life." To those who think that cyber relationships aren't real, I can tell you that you're wrong. Without spending one's life online, one can still cultivate relationships with other real people in a virtual domain. And when things turn sour, it hurts just like it hurts "in real life."
Other things that have been going on, but seem to fall into the category of "nothing going on" have been lovely weather, playing outside, baking some really good cookies and realizing that Easter is almost here. I could make a blog post about any of those, I guess.
Okay, I'll share the cookie recipe.
Toffee Dream Cookies
2 1/3 all purpose flour
1 pkg (102g) instant vanilla pudding mix
1 tsp baking powder
1/2 tsp baking soda
1 C butter (if using unsalted add 1/4tsp salt to the recipe)
1 C packed dark brown sugar
2 eggs
2 tsp real vanilla extract
2 C toffee bits (I just used a whole package - I think it's slightly less)
1 Preheat oven to 375F. In a bowl, whisk together the flour, pudding mix, baking powder, baking soda and salt, if using. Set aside.
2 In a large bowl with an electric hand mixer, or in a KitchenAid, cream butter and brown sugar on medium speed until light and fluffy, about 2 minutes. Scrape down. Add eggs, one at a time, until well combined. Beat in vanilla. Scrape down the sides again.
3 On low speed, or by hand, slowly add the flour mixture until just combined. Mix in the toffee bits.
4 Using a cookie scoop or spoons, drop tablespoonfuls of dough about 2 inches apart on parchment lined cookie sheets. Bake one sheet at a time for 8-10 minutes, until the edges start to turn light golden.
4 Cool in pans on wire rack for 5 minutes before transferring the cookies directly to the rack to cool completely.
Recipe says it makes 3 1/2 dozen. I used a small cookie scoop and got 60 cookies.
My kids declared these to be the best cookies ever. High praise indeed. Especially when it comes with hugs and "I love you"s.
So there, I had something to share after all. LOL
For example, an online community of foodies that I nurtured for nearly a decade fell apart last week. We were a tiny group. Maybe a dozen on a really good day. But we had shared a lot. We were friends. Or so I thought. Turns out I was convenient, not cared about. I could set up and manage the actual community site, so I was needed. But eventually they all found social networking and showed their true colours. I'd been used.
Please don't think that this is a "poor me" type entry. It's not. I was just stunned by the emotional reaction I had to losing an online community. To losing people who, for the most part, I'd never met "in real life." To those who think that cyber relationships aren't real, I can tell you that you're wrong. Without spending one's life online, one can still cultivate relationships with other real people in a virtual domain. And when things turn sour, it hurts just like it hurts "in real life."
Other things that have been going on, but seem to fall into the category of "nothing going on" have been lovely weather, playing outside, baking some really good cookies and realizing that Easter is almost here. I could make a blog post about any of those, I guess.
Okay, I'll share the cookie recipe.
Toffee Dream Cookies
2 1/3 all purpose flour
1 pkg (102g) instant vanilla pudding mix
1 tsp baking powder
1/2 tsp baking soda
1 C butter (if using unsalted add 1/4tsp salt to the recipe)
1 C packed dark brown sugar
2 eggs
2 tsp real vanilla extract
2 C toffee bits (I just used a whole package - I think it's slightly less)
1 Preheat oven to 375F. In a bowl, whisk together the flour, pudding mix, baking powder, baking soda and salt, if using. Set aside.
2 In a large bowl with an electric hand mixer, or in a KitchenAid, cream butter and brown sugar on medium speed until light and fluffy, about 2 minutes. Scrape down. Add eggs, one at a time, until well combined. Beat in vanilla. Scrape down the sides again.
3 On low speed, or by hand, slowly add the flour mixture until just combined. Mix in the toffee bits.
4 Using a cookie scoop or spoons, drop tablespoonfuls of dough about 2 inches apart on parchment lined cookie sheets. Bake one sheet at a time for 8-10 minutes, until the edges start to turn light golden.
4 Cool in pans on wire rack for 5 minutes before transferring the cookies directly to the rack to cool completely.
Recipe says it makes 3 1/2 dozen. I used a small cookie scoop and got 60 cookies.
My kids declared these to be the best cookies ever. High praise indeed. Especially when it comes with hugs and "I love you"s.
So there, I had something to share after all. LOL
Monday, January 25, 2010
Whoopie Pies
Okay, I know that these are popular in some parts. But I'm in Canada, and apart from hearing them mentioned by Americans on forums, I have never had any experience with them. Until this weekend.
It was my turn to make snack for church, and for whatever reason I decided that I wanted to do a filled cookie. I think I was inspired by a marshmallow filling recipe in my Mennonite Treasury cookbook. I remembered the concept of the Whoopie Pie, and began looking up recipes. The one that I came across didn't use marshmallow fluff in the filling, which was good, since I had none. Comments were made about the extreme sweetness, so after reading a bit more I decided to add coffee to the icing sugar mixture by way of steeping it in the warmed milk, which I then cooled and strained. The finished recipe was actually quite good, though I cannot imagine being able to use all of the frosting. A large amount is produced by this recipe.
And here it is. My take on the Whoopie Pie.
1 cup sugar
6 tablespoons vegetable oil
2 eggs
2 cups all-purpose flour
1/2 cup baking cocoa
1 teaspoon baking soda
1/2 teaspoon salt
4 tablespoons milk
Filling
4 tablespoons milk
1 tablespoon ground coffee (not instant)
4 tablespoons butter or shortening, softened to room temp
3-3 1/4 cups confectioners' sugar
Preheat oven to 425. In a mixing bowl, beat sugar and oil until crumbly. Add eggs and beat well. In separate bowl, combine flour, cocoa, baking soda and salt.
Gradually beat flour mixture into sugar mixture. Add milk and mix together well.
Scoop out small mounds of batter and place 2 inches apart on a greased or parchment lined baking sheet.
Bake at 425 for 5-6 minutes or until tops are cracked. Cool for 3 minutes before removing to wire racks to cool.
Filling: Heat milk slightly and add coffee grounds. Let steep until cool. In a mixing bowl, beat together butter and confectioners' sugar. Strain the milk and beat into the sugar until fluffy.
Spread filling generously on to flat bottom of cooled whoopie pie and top with another whoopie pie to make a sandwich.
Makes about 1 dozen complete cookies.
It was my turn to make snack for church, and for whatever reason I decided that I wanted to do a filled cookie. I think I was inspired by a marshmallow filling recipe in my Mennonite Treasury cookbook. I remembered the concept of the Whoopie Pie, and began looking up recipes. The one that I came across didn't use marshmallow fluff in the filling, which was good, since I had none. Comments were made about the extreme sweetness, so after reading a bit more I decided to add coffee to the icing sugar mixture by way of steeping it in the warmed milk, which I then cooled and strained. The finished recipe was actually quite good, though I cannot imagine being able to use all of the frosting. A large amount is produced by this recipe.
And here it is. My take on the Whoopie Pie.
Mocha Whoopie Pies
1 cup sugar
6 tablespoons vegetable oil
2 eggs
2 cups all-purpose flour
1/2 cup baking cocoa
1 teaspoon baking soda
1/2 teaspoon salt
4 tablespoons milk
Filling
4 tablespoons milk
1 tablespoon ground coffee (not instant)
4 tablespoons butter or shortening, softened to room temp
3-3 1/4 cups confectioners' sugar
Preheat oven to 425. In a mixing bowl, beat sugar and oil until crumbly. Add eggs and beat well. In separate bowl, combine flour, cocoa, baking soda and salt.
Gradually beat flour mixture into sugar mixture. Add milk and mix together well.
Scoop out small mounds of batter and place 2 inches apart on a greased or parchment lined baking sheet.
Bake at 425 for 5-6 minutes or until tops are cracked. Cool for 3 minutes before removing to wire racks to cool.
Filling: Heat milk slightly and add coffee grounds. Let steep until cool. In a mixing bowl, beat together butter and confectioners' sugar. Strain the milk and beat into the sugar until fluffy.
Spread filling generously on to flat bottom of cooled whoopie pie and top with another whoopie pie to make a sandwich.
Makes about 1 dozen complete cookies.
Wednesday, November 18, 2009
Cookie creation
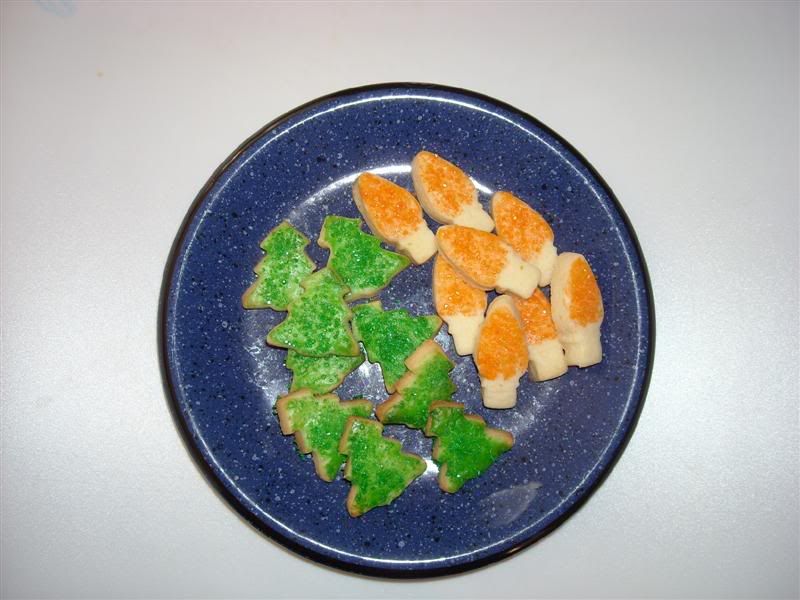
I bought some flavoured oils a couple of weeks ago and have been wanting to play with them. Spearmint oil, cinnamon oil and orange oil (plus apple and amaretto flavourings). Today I was in the mood to make shortbread, and decided it would be a good time to play. Here is the result...
Orange Cinnamon Shortbread
1/2 C butter, softened
1/2 C sugar
1/2 tsp orange oil
1/4 tsp cinnamon oil
2 C all purpose flour
water
Cream together the butter, sugar and oils. Add the flour and mix to combine. If it's too dry, add water a teaspoon at a time to bring it almost together.
Form the dough into a ball with your hands and roll out to 1/4" thickness on a lightly floured surface. Cut into desired shapes (I used small Christmas ornament cookie cutters).
Bake on an ungreased cookie sheet for 10-15 minutes, until the bottoms are light brown. Cool on racks.
Makes about 60 small cookies
~ I decorated mine by mixing some paste food colouring with a splash of cream and painting it on the unbaked cookies. Then I sprinkled them with some coloured sugar and baked them. ~

(I make no apologies for the quality of the picture. I'm a blogger, not a photographer. LOL)
Orange Cinnamon Shortbread
1/2 C butter, softened
1/2 C sugar
1/2 tsp orange oil
1/4 tsp cinnamon oil
2 C all purpose flour
water
Cream together the butter, sugar and oils. Add the flour and mix to combine. If it's too dry, add water a teaspoon at a time to bring it almost together.
Form the dough into a ball with your hands and roll out to 1/4" thickness on a lightly floured surface. Cut into desired shapes (I used small Christmas ornament cookie cutters).
Bake on an ungreased cookie sheet for 10-15 minutes, until the bottoms are light brown. Cool on racks.
Makes about 60 small cookies
~ I decorated mine by mixing some paste food colouring with a splash of cream and painting it on the unbaked cookies. Then I sprinkled them with some coloured sugar and baked them. ~

(I make no apologies for the quality of the picture. I'm a blogger, not a photographer. LOL)
Subscribe to:
Posts (Atom)